Following on from my posts about problems with the trailer, here is the latest on the continuing saga of the jammed centreboard.
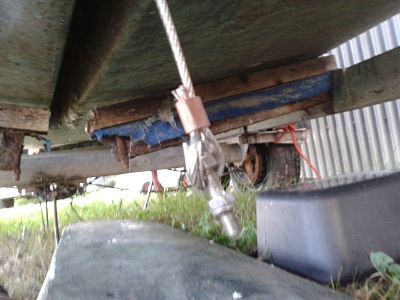
The good news is that the board has now been freed off and dropped out of the boat - this was achieved by looping webbing straps round the hinge pin and levering the board out using a 20ft scaffolding pole against the side of the trailer! - the bad news is what I have found was jamming the board in the trunk. Clearly a repair to the lifting wire attachment by the PO had allowed the wire loop and bolt to become jammed between the board and the trunk, and the attached photograph shows what was dangling down (unattached) when the board was finally forced out: (first photo). The trunk has been gouged by the bolt but should be repairable using suitable filler.
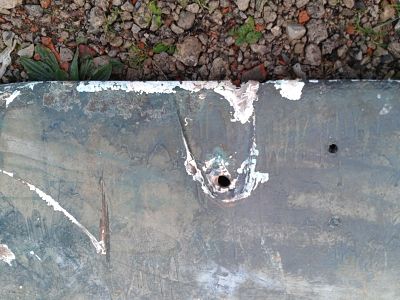
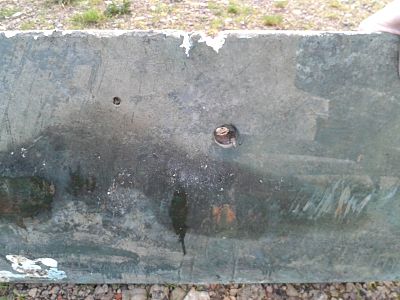
The board itself looks in a sorry state generally, and has been quite battered during its life. My immediate question I need an answer to, is what arrangement should the lifting wire attachment have? More photos follow, but to me it looks like there is a recess on the port side (l/h) for a hanger bracket which is then attached to the lifting wire. Is my assumption correct?
Incidentally, the horribly gouged edge is the result of me trying to tap the board out from above through an access hole, but should be repairable.
Finally, the hanger for mounting the keel in the trunk appears to have a stop-pin broken off, but appears to be corroded at the ends, so perhaps corroded off more than broken. If this is stainless steel, can it be welded back in place using normal oxy-acetylene welding, or is it a more specialised process?
I would really appreciate all your helpful comments on making the whole assembly good, what type of repair filler I should use, and what parts I may need to put it all together, including any specification regarding the end of the lifting wire. Many thanks to you all :)
Centreboard Lifting Wire & Bolt
Lifting Wire Attachment Point Left
Lifting Wire Attachment Point Right
Hanger Fork & Stop Pin

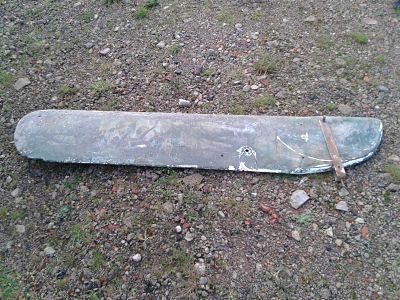
Complete Centreboard
Hi John
That all looks a bit of a mess! I've never been quite sure how the lifting wire arrangement was supposed to be configured, because the only Xs I've been involved with have had the wire replaced with regular 8mm line (that's my former boat "Milestone II", and Richard Greenway's "Lonach"). This was also the recommendation from several contributors on the USA macgregorsailor forum (which I haven't visited for a long time now).
When I first took my board out, it had a line simply looped through the lifting hole and tied with a bowline. I didn't like that too much, so my solution was to drill a new 8mm hole through the flattened area of the board, but nearer the edge. I then dropped a new line down from the deck, passed it through the original hole from the flattened side, then back through the new hole and tied it off in a simple overhand knot. This served perfectly for the seven years I owned the boat, and as far as I know is still doing its job. Richard's new board was made using mine as a template, so the maker replicated the two holes, and I fitted it into Lonach the same way!
I've managed to dig out some pics of my board when I originally fixed it seven years ago!
The last two pics show the stop that protrudes from the top of the board. This comes up against the cross pin in the hanger to prevent the board swinging beyond vertical. This is easily damaged, the main culprit being grounding the board when going backwards. In your case it appears to be completely missing, and has taken out the cross pin too.
I found when i looked closely at the damage to this bit of my board, that it was reinforced by a couple of 1/2" steel bolts embedded in the GRP - crude but effective! So I just built it up again with fibre-reinforced body filler resin. It lasted pretty well, though needed re-building again when I sent it to be used as a template last winter.
Stainless welding is a bit of a specialist job, I've never tried it myself (I'm rubbish at regular welding anyway!). I've always found the local boatyard happy to do any odd bits like that for a small charge.
I hope that helps, shouldn't be too hard to get it all fixed.
P1010041_1
P1010040_1
P1010039_1
P3180037_1
Rick Jones (Treasurer), former 26X & 19 owner, Isle of Wight
Good news! - (and its a mac board too!) Although, the stop bump looks missing on the tip, but might be the photo?
junk the wire and use rope, its what they went with on later boats anyway. Dyneema ideally, 8/10mm. simple overhand knot, or bowline in my case. the length? - have to look it up?
I used epoxy for some nicks on mine. Millput stuff is meant to be as good and cheaper, although not used myself.
http://www.ebay.co.uk/itm/Plastic-Padding-Marine-Epoxy-Filler-2-Pack-Fre...
I welded up some extra thickness plates on the side of the hanger as mine some signs of electrolysis, I used a cheap mig welder, with 100% argon/316 stainless wire. recommend the same if yours shows any sign of damage, as the pin/board can drop as a result.
incredible to me that the PO bodged the wire rope, then super bodged the trailer to accommodate it! Double check everything else on the boat.
Great Tony and Rick, I feel better already! Especially useful to get the link to the marine epoxy filler, that looks just the job for doing a proper repair. I will definitely ditch the wire and install a rope lift, and I assume there must be enough clearance in the trunk between the centreboard and the overhand knot in the recess. Anyway, your experience of it working fine for years is good enough for me. One thing; I want to fit a longer bolt on the hanger, so can you give me an approximate length I should look for?
I think the bolt I used was M10 x 10cm. You should be able to take measurements from my photo, and work it out knowing the length of the hanger. Also, I think the trailer box section it's leaning against is 10x5 cm (4x2 in).
Rick Jones (Treasurer), former 26X & 19 owner, Isle of Wight
glad feeling more positive.
FYI - i didn't replace my hanger bolt, I just tacked a smaller dia threaded length on the end, (so I couild drop the washer/nut over the weld) about 12cm or so, just enough to feed in the hole from underneath, you can block the CB, then pull it up from above. a stiff piece of wire/other would do the same job.
Don't forget some sealant but not silicone. nor strong adhesive type (5200) as want to be able remove. CT1 is rated highly, any polyurethane is prob okay though. (cant remember name of mine?) but cheaper than silkaflex 291, which seems to go off in the tube, in a fridge or not.
Well, Tony, I'm working on it. I've recently found that it also leaks rain water into the bilges in biblical proportions; I've pumped out the lockers every time it rained, and now it has a tarpaulin over the centre of the boat, it's as dry as a bone. So obviously the deck fittings need re-sealing, I suspect where the PO has run electrics through to the masthead.
And the electrics, oh my Lord, what a mess! It looks like an explosion in a spaghetti factory in the locker next to the cooker. So my to-do list grows every longer, but I guess I'll get everything sorted by next season :)
Hi John
Don't despair! I spent the first winter I owned my 26X (purchased one October) going through everything in detail, learning a lot, and fixing, upgrading, or replacing all the stuff I wasn't happy with. The benefit is I knew the boat inside out when I first went out on the water.
Rain leaks are a well-known problem with Macs. The main culprits are usually the chainplates for the shrouds and forestay tang. You can have some success sealing around the slot in the horizontal plate with marine silicone, but it doesn't last too long. Better is to remove the horizontal cover plates and seal thoroughly underneath with Sikaflex or similar. That's how it's done in manufacture. It means drilling out the pop rivets, and re-rivetting. A multi-size hand rivetter will do it, my local chandlery carried suitable sized rivets.
The second culprit on mine was all the bolts through the deck, mainly the ones holding down the jib car tracks and hatch guides. The one that also secures the block that the centreboard line runs round was particularly bad - not surprising as this gets a lot of varying load, and had worked noticeably loose. You have to prise out the blanking plates in the cabin ceiling to get to the nuts underneath. Bolts that were very loose I removed and re-sealed, others I just tightened up the nuts.
all of them were slightly loose (boat was 10-years old at the time).
Of course any other through-deck fitting might also be a problem, so best bet is check and re-seal all.
I also later had a bit of a problem with the screws through the windows. The windows themselves were securely bonded and watertight, with no need for the screws, but water was leaking through the screw holes! I just systematically took them out and replaced with a bit of black sealant.
Eventually it was completely rain-tight, except that in very high winds and rain, water could blow in round the gaps between the hatch and washboard.
Rick Jones (Treasurer), former 26X & 19 owner, Isle of Wight
Thanks so much Rick, I'll take all your comments on board (so to speak!) and check out everything where the rain might be getting in. The chain-plates have been very crudely resealed by the PO with lashings of some sort of sealant, or possibly resin-based filler, but I will check everything as you suggest.
As I've said before, It's so good as a new owner to know that I'm not the only one with these problems, and I don't know where I'd be without this forum!
Just a few notes on welding stainless steel if you are considering a repair. Generally stainless steel should be welded using a TIG welder with pure argon as the cooling gas. Control of welding heat is critical partly to avoid distortion but mainly in the case of marine applications to avoid rusting. If the metal around the weld is overheated which may happen with gas welding the stainless properties will be lost and it will rust. If you are welding tubing it is also generally best to lead an argon feed inside the pipe to dissipate the heat thus producing a more reliable joint. A professional outfit won't charge you a fortune for a repair like this and hopefully it should last. Incidentally I have a spare new hanger bracket with a ss pin in my garage.
Just a to put a couple of welding points straight: (I was about to write a diatribe on the niceties of TIG welding but I copied this from another site instead)
I trust you are all paying attention, there will be a test later :lol:
There are 2 common grades of stainless: 304L (welded using 308L filler), and 316L which is welded using 316L filler. 316L is often referred to as 'marine grade'
The Argon isn't there to cool the weld (Argon actually has a low thermal conductivity), it is to shield the weld from the oxygen in air.
To make a steel "stainless" it needs to contain a minimum of 12% Chromium (Cr). The Cr oxidises in the atmosphere forming a passive layer on the surface. This layer, unlike coated steels, is self repairing should it be scratched.
The problem with 12% Cr is that it is fairly brittle and only provides the minimum corrosion resistance. Increasing the Chromium content to 17% improves corrosion resistance but increases brittleness. Adding 8% Nickel makes the steel ductile again. Thus 18/8 stainless was born (304). 316 / 316L has additional Molybdenum and higher Nickel which provides greater corrosion resistance.
With stainless when you see two numbers they always refer to the Chromium and Nickel content - 18/8 is 18%Cr and 8%Ni. If you see 3 numbers like 19/12/3 they refer to the Chromium, Nickel and Molybdenum content. 316L is 19%Cr, 12%Ni and 3%Mo.
Why is 308L filler used for 304L? Basically there are a number of grades that do similar jobs, 302L, 303L and 304L (they are 17/7, 18/8 and 19/9 respectively). 308L is 20/10 so can be used to weld all 3 grades.
Stainless is easy to weld but very difficult to keep flat, the coefficient of linear expansion is 1.7 times that of mild steel. There isn’t much you can do about that except to weld it quickly and by doing so minimise the heat input.
304 and 316 (as opposed to the L low carbon versions) suffer from weld decay. When heated to welding temperatures the Chromium combines with the Carbon leaving the steel short of Chromium and therefore unable to self repair itself.
This was virtually eliminated by introducing stabilised stainless steels 347 and 321 which contain Niobium or Titanium which sacrifices itself to save the Chromium, however, when lower carbon versions 304L and 316L were introduced the problem of weld decay was eliminated. These days the higher (in fact, normal) carbon versions are only used for applications where heat resistance is needed.
Dave Newton Sailbadthesinner
Pages